Appendix D : Upgrading to 1.0 APIs
STOP
This is being kept for archival purposes only from the original Atom documentation. As this may no longer be relevant to Pulsar, use this at your own risk. Current Pulsar documentation is found at documentation home.
Upgrading to 1.0 APIs
Note
Note: Atom has been at v1.x for over a year, so this appendix is mostly obsolete at this point. We're retaining it for historic and reference purposes.
Atom is at 1.0! Much of the effort leading up to the 1.0 has been cleaning up APIs in an attempt to future proof, and make a more pleasant experience developing packages. If you have developed packages or syntaxes for Atom before the 1.0 API, you can find some tips on upgrading your work in this appendix.
Upgrading Your Package
This document will guide you through the large bits of upgrading your package to work with 1.0 APIs.
TL;DR
We've set deprecation messages and errors in strategic places to help make sure you don't miss anything. You should be able to get 95% of the way to an updated package just by fixing errors and deprecations. There are a couple of things you can do to get the full effect of all the errors and deprecations.
Use atom-space-pen-views
If you use any class from require 'atom' with a $ or View in the name, add the atom-space-pen-views module to your package's package.json file's dependencies:
{
	"dependencies": {
		"atom-space-pen-views": "^2.0.3"
	}
}
Then run apm install in your package directory.
Require views from atom-space-pen-views
Anywhere you are requiring one of the following from atom you need to require them from atom-space-pen-views instead.
# require these from 'atom-space-pen-views' rather than 'atom'
$
$$
$$$
View
TextEditorView
ScrollView
SelectListView
So this:
# Old way
{$, TextEditorView, View, GitRepository} = require 'atom'
Would be replaced by this:
# New way
{GitRepository} = require 'atom'
{$, TextEditorView, View} = require 'atom-space-pen-views'
Run specs and test your package
You wrote specs, right!? Here's where they shine. Run them with cmd-shift-P, and search for run package specs. It will show all the deprecation messages and errors.
Update the engines field
When you are deprecation free and all done converting, upgrade the engines field in your package.json:
{
	"engines": {
		"atom": ">=0.174.0 <2.0.0"
	}
}
Examples
We have upgraded all the core packages. Please see this issue for a link to all the upgrade PRs.
Deprecations
All of the methods in Atom core that have changes will emit deprecation messages when called. These messages are shown in two places: your package specs, and in Deprecation Cop.
Specs
Just run your specs, and all the deprecations will be displayed in yellow.
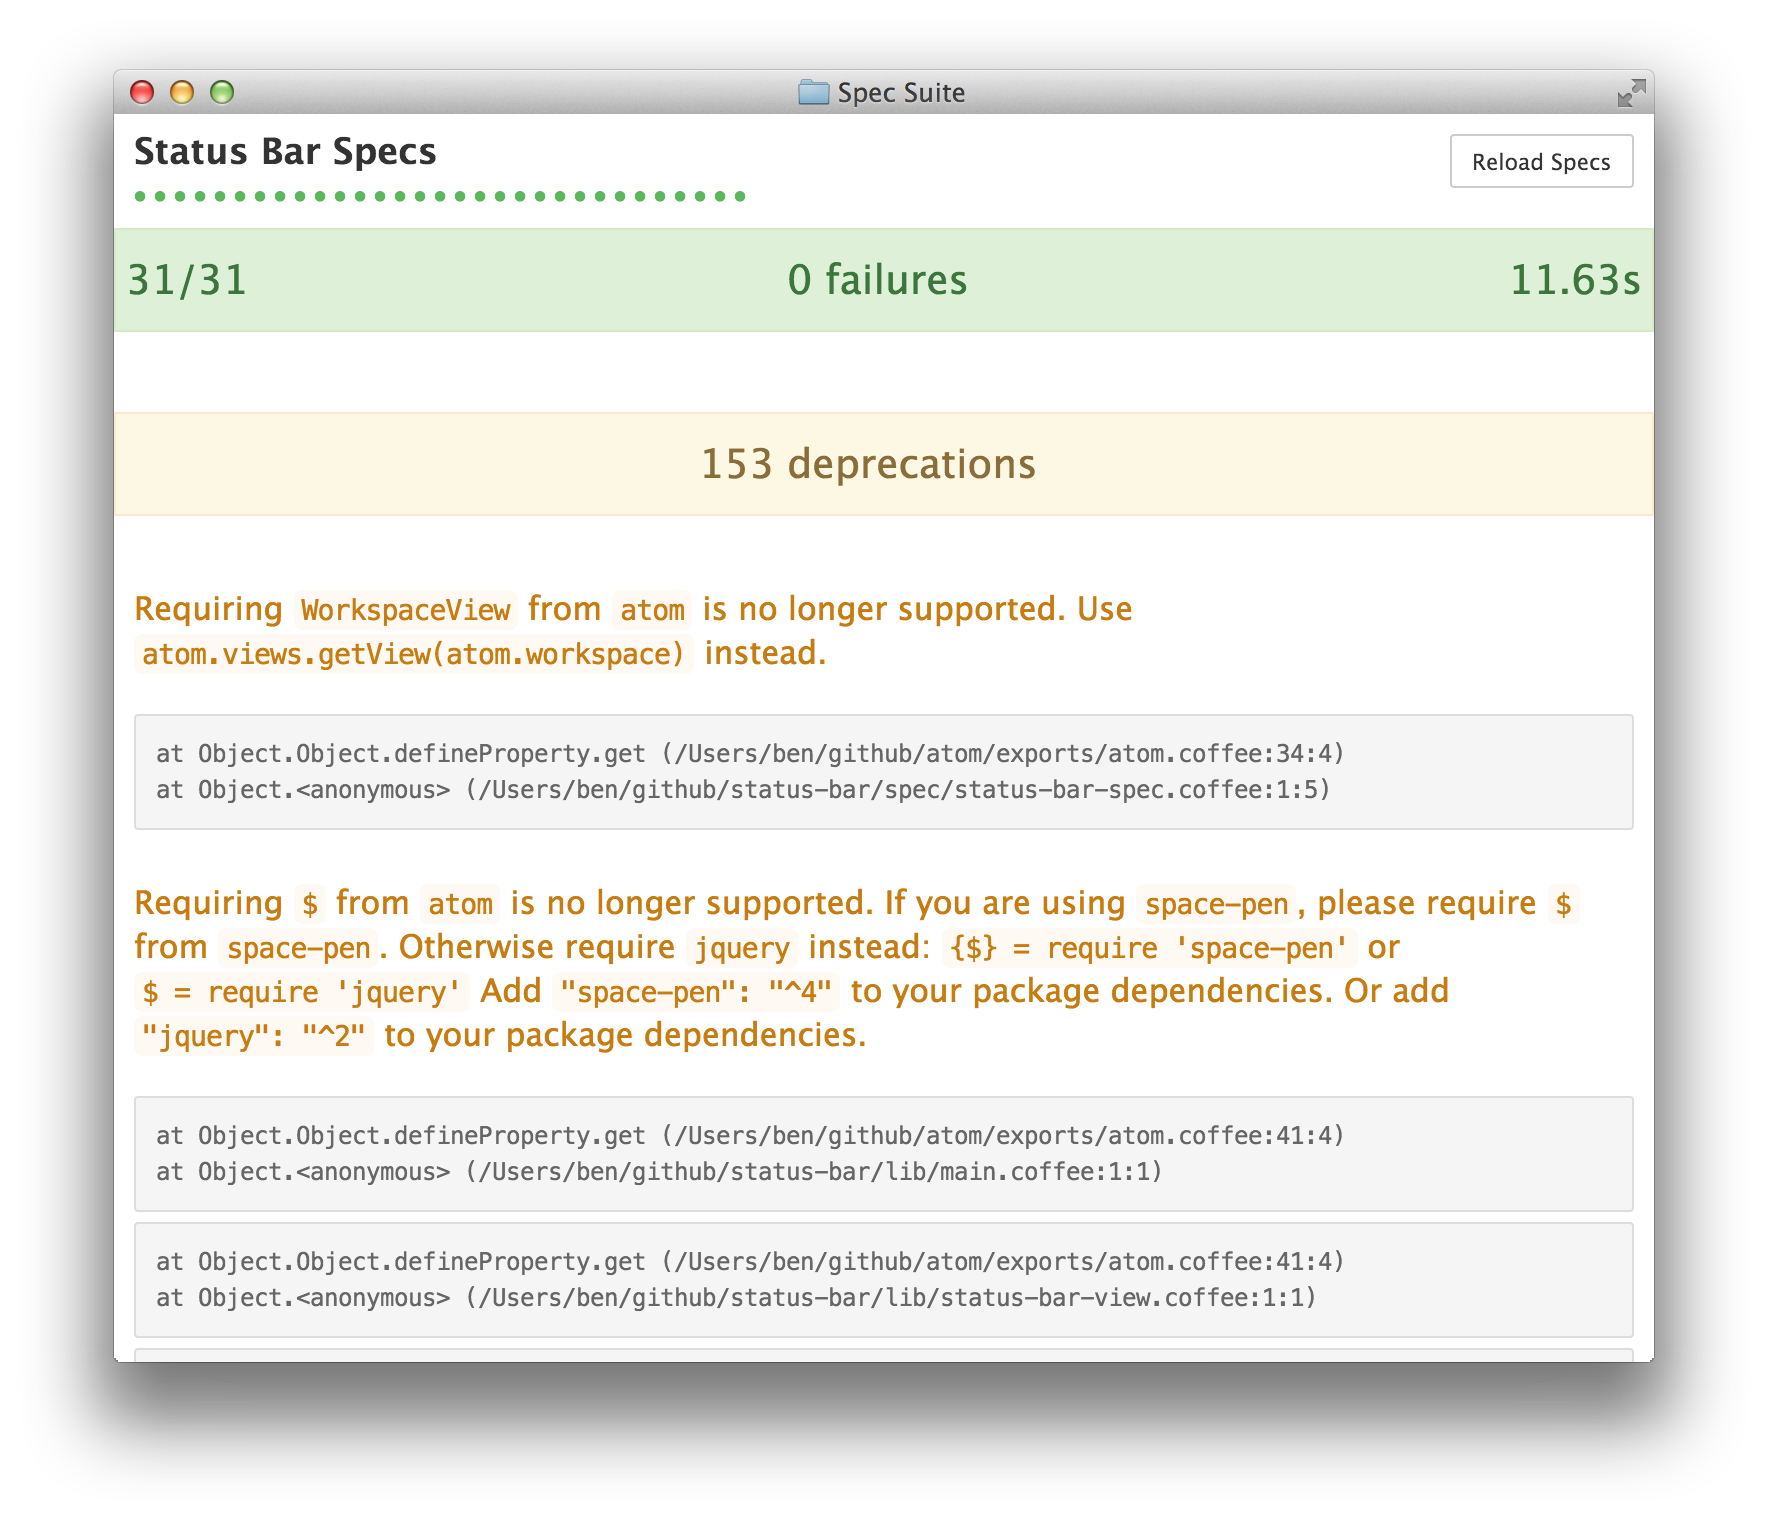
Note
Note: Deprecations are only displayed when executing specs through the "Window: Run Package Specs" command in the Atom UI. Deprecations are not displayed when running specs at the terminal.
Deprecation Cop
Run Atom in Dev Mode, atom --dev, with your package loaded, and open Deprecation Cop (search for "deprecation" in the command palette). Deprecated methods will appear in Deprecation Cop only after they have been called.
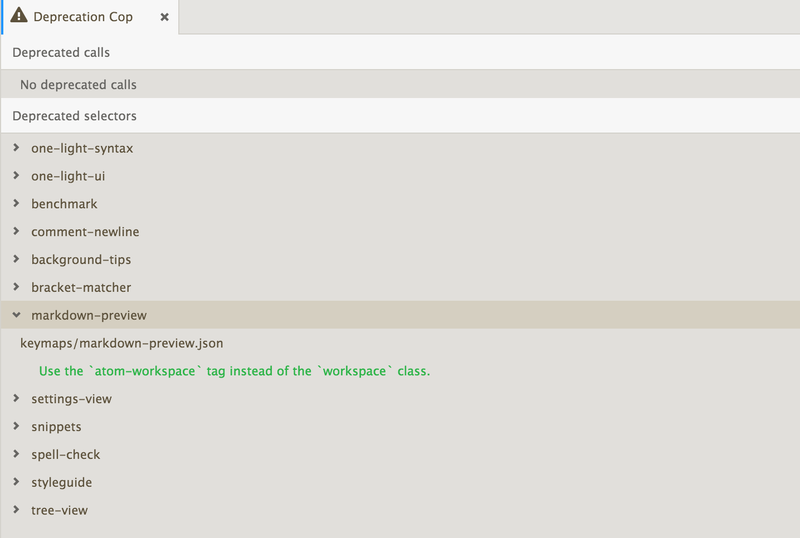
When Deprecation Cop is open, and deprecated methods are called, a Refresh button will appear in the top right of the Deprecation Cop interface. So exercise your package, then come back to Deprecation Cop and click the Refresh button.
Upgrading your Views
Previous to 1.0, views were baked into Atom core. These views were based on jQuery and space-pen. They looked something like this:
# The old way: getting views from atom
{$, TextEditorView, View} = require 'atom'

module.exports =
class SomeView extends View
  @content: ->
    @div class: 'find-and-replace', =>
      @div class: 'block', =>
        @subview 'myEditor', new TextEditorView(mini: true)
  #...
The New
require 'atom' no longer provides view helpers or jQuery. Atom Core is now 'view agnostic'. The preexisting view system is available from a new Node module: atom-space-pen-views.
atom-space-pen-views now provides jQuery, space-pen views, and Atom specific views:
# These are now provided by atom-space-pen-views
$
$$
$$$
View
TextEditorView
ScrollView
SelectListView
Adding the module dependencies
To use the new views, you need to specify the atom-space-pen-views module in your package's package.json file's dependencies:
{
	"dependencies": {
		"atom-space-pen-views": "^2.0.3"
	}
}
space-pen bundles jQuery. If you do not need space-pen or any of the views, you can require jQuery directly.
{
	"dependencies": {
		"jquery": "^2"
	}
}
Converting your views
Sometimes it is as simple as converting the requires at the top of each view page. I assume you read the 'TL;DR' section and have updated all of your requires.
Upgrading classes extending any space-pen View
afterAttach and beforeRemove updated
The afterAttach and beforeRemove hooks have been replaced with attached and detached and the semantics have changed.
afterAttach was called whenever the node was attached to another DOM node, even if that parent node wasn't present in the DOM. afterAttach also was called with a boolean indicating whether or not the element and its parents were on the DOM. Now the attached hook is only called when the node and all of its parents are actually on the DOM, and is not called with a boolean.
beforeRemove was only called when $.fn.remove was called, which was typically used when the node was completely removed from the DOM. The new detached hook is called whenever the DOM node is detached, which could happen if the node is being detached for reattachment later. In short, if beforeRemove is called the node is never coming back. With detached it might be attached again later.
# Old way
{View} = require 'atom'
class MyView extends View
  afterAttach: (onDom) ->
    #...

  beforeRemove: ->
    #...
# New way
{View} = require 'atom-space-pen-views'
class MyView extends View
  attached: ->
    # Always called with the equivalent of @afterAttach(true)!
    #...

  detached: ->
    #...
subscribe and subscribeToCommand methods removed
The subscribe and subscribeToCommand methods have been removed. See the Eventing and Disposables section for more info.
Upgrading to the new TextEditorView
All of the atom-specific methods available on the TextEditorView have been moved to the TextEditor, available via TextEditorView::getModel. See the TextEditorView docs and TextEditor docs for more info.
Upgrading classes extending ScrollView
The ScrollView has very minor changes.
You can no longer use @off to remove default behavior for core:move-up, core:move-down, etc.
# Old way to turn off default behavior
class ResultsView extends ScrollView
  initialize: (@model) ->
    super()
    # turn off default scrolling behavior from ScrollView
    @off 'core:move-up'
    @off 'core:move-down'
    @off 'core:move-left'
    @off 'core:move-right'
# New way to turn off default behavior
class ResultsView extends ScrollView
  initialize: (@model) ->
    disposable = super()
    # turn off default scrolling behavior from ScrollView
    disposable.dispose()
- Check out an example from find-and-replace.
- See the docs for all the options.
Upgrading classes extending SelectListView
Your SelectListView might look something like this:
# Old!
class CommandPaletteView extends SelectListView
  initialize: ->
    super()
    @addClass('command-palette overlay from-top')
    atom.workspaceView.command 'command-palette:toggle', => @toggle()

  confirmed: ({name, jQuery}) ->
    @cancel()
    # do something with the result

  toggle: ->
    if @hasParent()
      @cancel()
    else
      @attach()

  attach: ->
    @storeFocusedElement()

    items = [] # TODO: build items
    @setItems(items)

    atom.workspaceView.append(this)
    @focusFilterEditor()

  confirmed: ({name, jQuery}) ->
    @cancel()
This attaches and detaches itself from the DOM when toggled, canceling magically detaches it from the DOM, and it uses the classes overlay and from-top.
The new SelectListView no longer automatically detaches itself from the DOM when cancelled. It's up to you to implement whatever cancel behavior you want. Using the new APIs to mimic the semantics of the old class, it should look like this:
# New!
class CommandPaletteView extends SelectListView
  initialize: ->
    super()
    # no more need for the `overlay` and `from-top` classes
    @addClass('command-palette')
    atom.commands.add 'atom-workspace', 'command-palette:toggle', => @toggle()

  # You need to implement the `cancelled` method and hide.
  cancelled: ->
    @hide()

  confirmed: ({name, jQuery}) ->
    @cancel()
    # do something with the result

  toggle: ->
    # Toggling now checks panel visibility,
    # and hides / shows rather than attaching to / detaching from the DOM.
    if @panel?.isVisible()
      @cancel()
    else
      @show()

  show: ->
    # Now you will add your select list as a modal panel to the workspace
    @panel ?= atom.workspace.addModalPanel(item: this)
    @panel.show()

    @storeFocusedElement()

    items = [] # TODO: build items
    @setItems(items)

    @focusFilterEditor()

  hide: ->
    @panel?.hide()
- And check out the conversion of
CommandPaletteViewas a real-world example. - See the
SelectListViewdocs for all options.
Using the model layer rather than the view layer
The API no longer exposes any specialized view objects or view classes. atom.workspaceView, and all the view classes: WorkspaceView, EditorView, PaneView, etc. have been globally deprecated.
Nearly all of the atom-specific actions performed by the old view objects can now be managed via the model layer. For example, here's adding a panel to the interface using the atom.workspace model instead of the workspaceView:
# Old!
div = document.createElement('div')
atom.workspaceView.appendToTop(div)
# New!
div = document.createElement('div')
atom.workspace.addTopPanel(item: div)
For actions that still require the view, such as dispatching commands or munging css classes, you'll access the view via the atom.views.getView() method. This will return a subclass of HTMLElement rather than a jQuery object or an instance of a deprecated view class (e.g. WorkspaceView).
# Old!
workspaceView = atom.workspaceView
editorView = workspaceView.getActiveEditorView()
paneView = editorView.getPaneView()
# New!
# Generally, just use the models
workspace = atom.workspace
editor = workspace.getActiveTextEditor()
pane = editor.getPane()

# If you need views, get them with `getView`
workspaceElement = atom.views.getView(atom.workspace)
editorElement = atom.views.getView(editor)
paneElement = atom.views.getView(pane)
Updating Specs
atom.workspaceView, the WorkspaceView class and the EditorView class have been deprecated. These two objects are used heavily throughout specs, mostly to dispatch events and commands. This section will explain how to remove them while still retaining the ability to dispatch events and commands.
Removing WorkspaceView references
WorkspaceView has been deprecated. Everything you could do on the view, you can now do on the Workspace model.
Requiring WorkspaceView from atom and accessing any methods on it will throw a deprecation warning. Many specs lean heavily on WorkspaceView to trigger commands and fetch EditorView objects.
Your specs might contain something like this:
# Old!
{WorkspaceView} = require 'atom'
describe 'FindView', ->
  beforeEach ->
    atom.workspaceView = new WorkspaceView()
Instead, we will use the atom.views.getView() method. This will return a plain HTMLElement, not a WorkspaceView or jQuery object.
# New!
describe 'FindView', ->
  workspaceElement = null
  beforeEach ->
    workspaceElement = atom.views.getView(atom.workspace)
Attaching the workspace to the DOM
The workspace needs to be attached to the DOM in some cases. For example, view hooks only work (attached() on View, attachedCallback() on custom elements) when there is a descendant attached to the DOM.
You might see this in your specs:
# Old!
atom.workspaceView.attachToDom()
Change it to:
# New!
jasmine.attachToDOM(workspaceElement)
Removing EditorView references
Like WorkspaceView, EditorView has been deprecated. Everything you needed to do on the view you are now able to do on the TextEditor model.
In many cases, you will not even need to get the editor's view anymore. Any of those instances should be updated to use the TextEditor instance instead. You should really only need the editor's view when you plan on triggering a command on the view in a spec.
Your specs might contain something like this:
# Old!
describe 'Something', ->
  [editorView] = []
  beforeEach ->
    editorView = atom.workspaceView.getActiveView()
We're going to use atom.views.getView() again to get the editor element. As in the case of the workspaceElement, getView will return a subclass of HTMLElement rather than an EditorView or jQuery object.
# New!
describe 'Something', ->
  [editor, editorElement] = []
  beforeEach ->
    editor = atom.workspace.getActiveTextEditor()
    editorElement = atom.views.getView(editor)
Dispatching commands
Since the editorElement objects are no longer jQuery objects, they no longer support trigger(). Additionally, Atom has a new command dispatcher, atom.commands, that we use rather than commandeering jQuery's trigger method.
From this:
# Old!
workspaceView.trigger 'a-package:toggle'
editorView.trigger 'find-and-replace:show'
To this:
# New!
atom.commands.dispatch workspaceElement, 'a-package:toggle'
atom.commands.dispatch editorElement, 'find-and-replace:show'
Eventing and Disposables
A couple large things changed with respect to events:
- All model events are now exposed as event subscription methods that return
Disposableobjects - The
subscribe()method is no longer available onspace-penViewobjects - An Emitter is now provided from
require 'atom'
Consuming Events
All events from the Atom API are now methods that return a Disposable object, on which you can call dispose() to unsubscribe.
# Old!
editor.on 'changed', ->
# New!
disposable = editor.onDidChange ->

# You can unsubscribe at some point in the future via `dispose()`
disposable.dispose()
Deprecation warnings will guide you toward the correct methods.
Using a CompositeDisposable
You can group multiple disposables into a single disposable with a CompositeDisposable.
{CompositeDisposable} = require 'atom'

class Something
  constructor: ->
    editor = atom.workspace.getActiveTextEditor()
    @disposables = new CompositeDisposable
    @disposables.add editor.onDidChange ->
    @disposables.add editor.onDidChangePath ->

  destroy: ->
    @disposables.dispose()
Removing View::subscribe and Subscriber::subscribe calls
There were a couple permutations of subscribe(). In these examples, a CompositeDisposable is used as it will commonly be useful where conversion is necessary.
subscribe(unsubscribable)
This one is very straight forward.
# Old!
@subscribe editor.on 'changed', ->
# New!
disposables = new CompositeDisposable
disposables.add editor.onDidChange ->
subscribe(modelObject, event, method)
When the modelObject is an Atom model object, the change is very simple. Just use the correct event method, and add it to your CompositeDisposable.
# Old!
@subscribe editor, 'changed', ->
# New!
disposables = new CompositeDisposable
disposables.add editor.onDidChange ->
subscribe(jQueryObject, selector(optional), event, method)
Things are a little more complicated when subscribing to a DOM or jQuery element. Atom no longer provides helpers for subscribing to elements. You can use jQuery or the native DOM APIs, whichever you prefer.
# Old!
@subscribe $(window), 'focus', ->
# New!
{Disposable, CompositeDisposable} = require 'atom'
disposables = new CompositeDisposable

# New with jQuery
focusCallback = ->
$(window).on 'focus', focusCallback
disposables.add new Disposable ->
  $(window).off 'focus', focusCallback

# New with native APIs
focusCallback = ->
window.addEventListener 'focus', focusCallback
disposables.add new Disposable ->
  window.removeEventListener 'focus', focusCallback
Providing Events: Using the Emitter
You no longer need to require emissary to get an emitter. We now provide an Emitter class from require 'atom'. We have a specific pattern for use of the Emitter. Rather than mixing it in, we instantiate a member variable, and create explicit subscription methods. For more information see the Emitter docs.
# New!
{Emitter} = require 'atom'

class Something
  constructor: ->
    @emitter = new Emitter

  destroy: ->
    @emitter.dispose()

  onDidChange: (callback) ->
    @emitter.on 'did-change', callback

  methodThatFiresAChange: ->
    @emitter.emit 'did-change', {data: 2}

# Using the evented class
something = new Something
something.onDidChange (eventObject) ->
  console.log eventObject.data # => 2
something.methodThatFiresAChange()
Subscribing To Commands
$.fn.command and View::subscribeToCommand are no longer available. Now we use atom.commands.add, and collect the results in a CompositeDisposable. See the docs for more info.
# Old!
atom.workspaceView.command 'core:close core:cancel', ->

# When inside a View class, you might see this
@subscribeToCommand 'core:close core:cancel', ->
# New!
@disposables.add atom.commands.add 'atom-workspace',
  'core:close': ->
  'core:cancel': ->

# You can register commands directly on individual DOM elements in addition to
# using selectors. When in a View class, you should have a `@element` object
# available. `@element` is a plain HTMLElement object
@disposables.add atom.commands.add @element,
  'core:close': ->
  'core:cancel': ->
Upgrading your stylesheet's selectors
Many selectors have changed, and we have introduced the Shadow DOM to the editor. See the Upgrading Your UI Theme And Package Selectors guide for more information in upgrading your package stylesheets.
Note
Note: The Shadow DOM was removed in Atom 1.13. The ::shadow and /deep/ selectors and the context-targeted style sheets described below won't work and should not be used anymore.
Upgrading Your UI Theme Or Package Selectors
In addition to changes in Atom's scripting API, we'll also be making some breaking changes to Atom's DOM structure, requiring style sheets and keymaps in both packages and themes to be updated.
Deprecation Cop
Deprecation Cop will list usages of deprecated selector patterns to guide you. You can access it via the Command Palette (cmd-shift-p, then search for Deprecation). It breaks the deprecations down by package:
Custom Tags
Rather than adding classes to standard HTML elements to indicate their role, Atom now uses custom element names. For example, <div class="workspace"> has now been replaced with <atom-workspace>. Selectors should be updated accordingly. Note that tag names have lower specificity than classes in CSS, so you'll need to take care in converting things.
| Old Selector | New Selector |
|---|---|
.editor | atom-text-editor |
.editor.mini | atom-text-editor[mini] |
.workspace | atom-workspace |
.horizontal | atom-workspace-axis.horizontal |
.vertical | atom-workspace-axis.vertical |
.pane-container | atom-pane-container |
.pane | atom-pane |
.tool-panel | atom-panel |
.panel-top | atom-panel.top |
.panel-bottom | atom-panel.bottom |
.panel-left | atom-panel.left |
.panel-right | atom-panel.right |
.overlay | atom-panel.modal |
Supporting the Shadow DOM
Text editor content is now rendered in the shadow DOM, which shields it from being styled by global style sheets to protect against accidental style pollution. For more background on the shadow DOM, check out the Shadow DOM 101 on HTML 5 Rocks. If you need to style text editor content in a UI theme, you'll need to circumvent this protection for any rules that target the text editor's content. Some examples of the kinds of UI theme styles needing to be updated:
- Highlight decorations
- Gutter decorations
- Line decorations
- Scrollbar styling
- Anything targeting a child selector of
.editor
During a transition phase, it will be possible to enable or disable the text editor's shadow DOM in the settings, so themes will need to be compatible with both approaches.
Shadow DOM Selectors
Chromium provides two tools for bypassing shadow boundaries, the ::shadow pseudo-element and the /deep/ combinator. For an in-depth explanation of styling the shadow DOM, see the Shadow DOM 201 article on HTML 5 Rocks.
::shadow
The ::shadow pseudo-element allows you to bypass a single shadow root. For example, say you want to update a highlight decoration for a linter package. Initially, the style looks as follows:
// Without shadow DOM support
atom-text-editor .highlight.my-linter {
	background: hotpink;
}
In order for this style to apply with the shadow DOM enabled, you will need to add a second selector with the ::shadow pseudo-element. You should leave the original selector in place so your theme continues to work with the shadow DOM disabled during the transition period.
// With shadow DOM support
atom-text-editor .highlight.my-linter,
atom-text-editor::shadow .highlight.my-linter {
	background: hotpink;
}
Check out the find-and-replace package for another example of using ::shadow to pierce the shadow DOM.
/deep/
The /deep/ combinator overrides all shadow boundaries, making it useful for rules you want to apply globally such as scrollbar styling. Here's a snippet containing scrollbar styling for the Atom Dark UI theme before shadow DOM support:
// Without shadow DOM support
.scrollbars-visible-always {
	::-webkit-scrollbar {
		width: 8px;
		height: 8px;
	}

	::-webkit-scrollbar-track,
	::-webkit-scrollbar-corner {
		background: @scrollbar-background-color;
	}

	::-webkit-scrollbar-thumb {
		background: @scrollbar-color;
		border-radius: 5px;
		box-shadow: 0 0 1px black inset;
	}
}
To style scrollbars even inside of the shadow DOM, each rule needs to be prefixed with /deep/. We use /deep/ instead of ::shadow because we don't care about the selector of the host element in this case. We just want our styling to apply everywhere.
// With shadow DOM support using /deep/
.scrollbars-visible-always {
	/deep/ ::-webkit-scrollbar {
		width: 8px;
		height: 8px;
	}

	/deep/ ::-webkit-scrollbar-track,
	/deep/ ::-webkit-scrollbar-corner {
		background: @scrollbar-background-color;
	}

	/deep/ ::-webkit-scrollbar-thumb {
		background: @scrollbar-color;
		border-radius: 5px;
		box-shadow: 0 0 1px black inset;
	}
}
Context-Targeted Style Sheets
The selector features discussed above allow you to target shadow DOM content with specific selectors, but Atom also allows you to target a specific shadow DOM context with an entire style sheet. The context into which a style sheet is loaded is based on the file name. If you want to load a style sheet into the editor, name it with the .atom-text-editor.less or .atom-text-editor.css extensions.
my-ui-theme/
  styles/
    index.less                   # loaded globally
    index.atom-text-editor.less  # loaded in the text editor shadow DOM
Check out this style sheet from the decoration-example package for an example of context-targeting.
Inside a context-targeted style sheet, there's no need to use the ::shadow or /deep/ expressions. If you want to refer to the element containing the shadow root, you can use the ::host pseudo-element.
During the transition phase, style sheets targeting the atom-text-editor context will also be loaded globally. Make sure you update your selectors in a way that maintains compatibility with the shadow DOM being disabled. That means if you use a ::host pseudo element, you should also include the same style rule matches against atom-text-editor.
Note
Note: The Shadow DOM was removed in Atom 1.13. The :host selector described below won't work and should not be used anymore.
Upgrading Your Syntax Theme
Text editor content is now rendered in the shadow DOM, which shields it from being styled by global style sheets to protect against accidental style pollution. For more background on the shadow DOM, check out the Shadow DOM 101 on HTML 5 Rocks.
Syntax themes are specifically intended to style only text editor content, so they are automatically loaded directly into the text editor's shadow DOM when it is enabled. This happens automatically when the theme's package.json contains a theme: "syntax" declaration, so you don't need to change anything to target the appropriate context.
When theme style sheets are loaded into the text editor's shadow DOM, selectors intended to target the editor from the outside no longer make sense. Styles targeting the .editor and .editor-colors classes instead need to target the :host pseudo-element, which matches against the containing atom-text-editor node. Check out the Shadow DOM 201 article for more information about the :host pseudo-element.
Here's an example from Atom's light syntax theme. Note that the atom-text-editor selector intended to target the editor from the outside has been retained to allow the theme to keep working during the transition phase when it is possible to disable the shadow DOM.
atom-text-editor,
:host {
	/* :host added */
	background-color: @syntax-background-color;
	color: @syntax-text-color;

	.invisible-character {
		color: @syntax-invisible-character-color;
	}
	/* more nested selectors... */
}